|
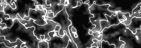
 Start with any texture you want to and convert it
to grayscale. Now convert back to RGB mode so you
can use your layers. Select all (CTRL+A) and copy
(CRTL+C). Now go to the menu SELECT/SAVE
SELECTION/OK. Go to the channels palette and
click on channel #4 (the one you just created)
and paste (CTRL+V). This should paste your black
and white pattern as a channel.
Start with any texture you want to and convert it
to grayscale. Now convert back to RGB mode so you
can use your layers. Select all (CTRL+A) and copy
(CRTL+C). Now go to the menu SELECT/SAVE
SELECTION/OK. Go to the channels palette and
click on channel #4 (the one you just created)
and paste (CTRL+V). This should paste your black
and white pattern as a channel. |
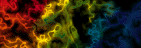 |
 Click on the RGB channel and then the Layers
palette. Select all if it is not already done and
fill you image with a solid black. Go to the menu
SELECT/LOAD SELECTION/#4. Hit (CTRL+H) to hide
the selection so that you can see better, but do
not deselect it. Now using you airbrush tool,
paint any color that you want to in the
selection. By doing this, it make a funny
pattern. I used several colors to create this
rainbow effect.
Click on the RGB channel and then the Layers
palette. Select all if it is not already done and
fill you image with a solid black. Go to the menu
SELECT/LOAD SELECTION/#4. Hit (CTRL+H) to hide
the selection so that you can see better, but do
not deselect it. Now using you airbrush tool,
paint any color that you want to in the
selection. By doing this, it make a funny
pattern. I used several colors to create this
rainbow effect. |
 |
 Create a new layer on top of you black one and
fill it with the background color you will be
using on your web page (mine was white). Using
the font tool type out your text, DO NOT click it
down or deselect it. Just save the selection
(SELECT/SAVE SELECTION/OK) and once it is saved,
press delete so you see only your white
background.
Create a new layer on top of you black one and
fill it with the background color you will be
using on your web page (mine was white). Using
the font tool type out your text, DO NOT click it
down or deselect it. Just save the selection
(SELECT/SAVE SELECTION/OK) and once it is saved,
press delete so you see only your white
background. |
 |
 Go
back to your background layer and SELECT/LOAD
SELECTION/#5 (an outline of the text you created
will appear). Copy it (CTRL+C), click on the
second layer you already created, and paste
(CTRL+V). You should now have your text there,
filled with the pattern you created in step 2. Go
back to your background layer and SELECT/LOAD
SELECTION/#5 (an outline of the text you created
will appear). Copy it (CTRL+C), click on the
second layer you already created, and paste
(CTRL+V). You should now have your text there,
filled with the pattern you created in step 2. |
 |
 To
create the 3D effect I used the Carve filter from
Alien Skin. If you do not have these set of
filters, get them. They will save you hours of
time. You may also use another filter (like
emboss) to create as similar effect. To
create the 3D effect I used the Carve filter from
Alien Skin. If you do not have these set of
filters, get them. They will save you hours of
time. You may also use another filter (like
emboss) to create as similar effect. |
 |
 To
make the shadow, I again used the Drop Shadow
filter from Alien Skin. If you do not have this,
just follow my other tutorial on how to create a
drop shadow. When all is done, save it and you
are finished. To
make the shadow, I again used the Drop Shadow
filter from Alien Skin. If you do not have this,
just follow my other tutorial on how to create a
drop shadow. When all is done, save it and you
are finished. |