 |
 Open up Gif
Construction Set and create a new animation (FILE ... NEW). You will see an automatic
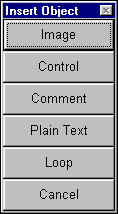
header generated for your animation. If your animation will be looping, then click on the
INSERT button and select LOOP. You will need a CONTROL statement before every image in
your animation, so click on INSERT ... CONTROL. The CONTROL statement tells the properties
of the image that follows it. You define the delay time for that frame & transparency
options in the CONTROL statement. Open up Gif
Construction Set and create a new animation (FILE ... NEW). You will see an automatic
header generated for your animation. If your animation will be looping, then click on the
INSERT button and select LOOP. You will need a CONTROL statement before every image in
your animation, so click on INSERT ... CONTROL. The CONTROL statement tells the properties
of the image that follows it. You define the delay time for that frame & transparency
options in the CONTROL statement. Now you need to import your images into
your animation. Click on INSERT ... IMAGE. A screen will come up asking you to locate the
images of your animation. The first image that you import is important, because it will
determine the color palette of the rest of the images. You may do a multiple-select when
opening you images into the animation by using the CTRL key on your keyboard. The first
image that you import, you will be asked how you want to treat the image. If every image
in your animation has the same color palette, then select: "use this image as the
global palette". If you frames in your animation switch colors, then it is best to
select: "Dither this image to th Global Palette". The Global Palette is a
default 256 color palette of the most common colors used on the net. Now you need to import your images into
your animation. Click on INSERT ... IMAGE. A screen will come up asking you to locate the
images of your animation. The first image that you import is important, because it will
determine the color palette of the rest of the images. You may do a multiple-select when
opening you images into the animation by using the CTRL key on your keyboard. The first
image that you import, you will be asked how you want to treat the image. If every image
in your animation has the same color palette, then select: "use this image as the
global palette". If you frames in your animation switch colors, then it is best to
select: "Dither this image to th Global Palette". The Global Palette is a
default 256 color palette of the most common colors used on the net.
 You may or may not be prompted
what to do on the second and subsequent images. If all of your images have the same
palette, then you will not be asked again what to do. If your images have different colors
for each frame, then another box will pop up asking you what to do with the second image.
It's best to select: "Dither this image to the global palette." and then check
the box at the bottom that says: " Use this selection for subsequent images".
After all of your frames are loaded into the animation, goto the next step. You may or may not be prompted
what to do on the second and subsequent images. If all of your images have the same
palette, then you will not be asked again what to do. If your images have different colors
for each frame, then another box will pop up asking you what to do with the second image.
It's best to select: "Dither this image to the global palette." and then check
the box at the bottom that says: " Use this selection for subsequent images".
After all of your frames are loaded into the animation, goto the next step.
 Now that all your images are
loaded into your animation, you will need to place a CONTROL statement, before each of the
images. If all of your frames will be having the same settings, then it is best to make
your settings in the first CONTROL tag and the copy and paste this tag before every image. Now that all your images are
loaded into your animation, you will need to place a CONTROL statement, before each of the
images. If all of your frames will be having the same settings, then it is best to make
your settings in the first CONTROL tag and the copy and paste this tag before every image.
Double-click on the CONTROL tag. You will need
to set a delay time for each frame depending on how fast you want the animation to go. Set
your delay to 15. If you don't plan on using a transparent background, goto step 6.
 If you want to have a
transparent color, click on the "transparent color" checkbox, and then click on
the little eyedropper icon. Your picture will be displayed, so click on the part of the
image that you want to be transparent. After doing this, the color will be displayed next
to the eyedropper icon. If it's wrong, click on the eyedropper again, and repeat. If it's
the color that you want, select the "Remove By" method. The most common is
"background". Now hit Ok. If you want to have a
transparent color, click on the "transparent color" checkbox, and then click on
the little eyedropper icon. Your picture will be displayed, so click on the part of the
image that you want to be transparent. After doing this, the color will be displayed next
to the eyedropper icon. If it's wrong, click on the eyedropper again, and repeat. If it's
the color that you want, select the "Remove By" method. The most common is
"background". Now hit Ok.
 Now click on the CONTROL tab
and hit CTRL+C (copy). Now click on the image below, and hit CTRL+V (paste). This will
place another CONTROL tag in front of your next frame with the same properties as the
first. Repeat this step for all the rest of your frames. When you are done, click on the
VIEW button, to see your animation. If it looks right, then goto the next step. If not,
you will have to determine what is wrong and modify the things that you have just done.
This takes a little trial & error, because every animation is different. Now click on the CONTROL tab
and hit CTRL+C (copy). Now click on the image below, and hit CTRL+V (paste). This will
place another CONTROL tag in front of your next frame with the same properties as the
first. Repeat this step for all the rest of your frames. When you are done, click on the
VIEW button, to see your animation. If it looks right, then goto the next step. If not,
you will have to determine what is wrong and modify the things that you have just done.
This takes a little trial & error, because every animation is different.
 You now need to define the size
of the animation. Double-click on the "header" at the top of the animation. Now
type in the height & width of the largest frame of your animation. (Most of the time,
all of the frames will be the same size). Also, select a background color, by clicking on
the colored box. Now you are done. If you want to add some comments about your animation
like you name, year, and email address, just goto your last image and click on INSERT ...
COMMENT. Double-click on the comment space and fill in what ever you want to. Now go up to
FILE and SAVE. Load up your browser and take a look at it. WOW Animation! You now need to define the size
of the animation. Double-click on the "header" at the top of the animation. Now
type in the height & width of the largest frame of your animation. (Most of the time,
all of the frames will be the same size). Also, select a background color, by clicking on
the colored box. Now you are done. If you want to add some comments about your animation
like you name, year, and email address, just goto your last image and click on INSERT ...
COMMENT. Double-click on the comment space and fill in what ever you want to. Now go up to
FILE and SAVE. Load up your browser and take a look at it. WOW Animation!
|


